In this article
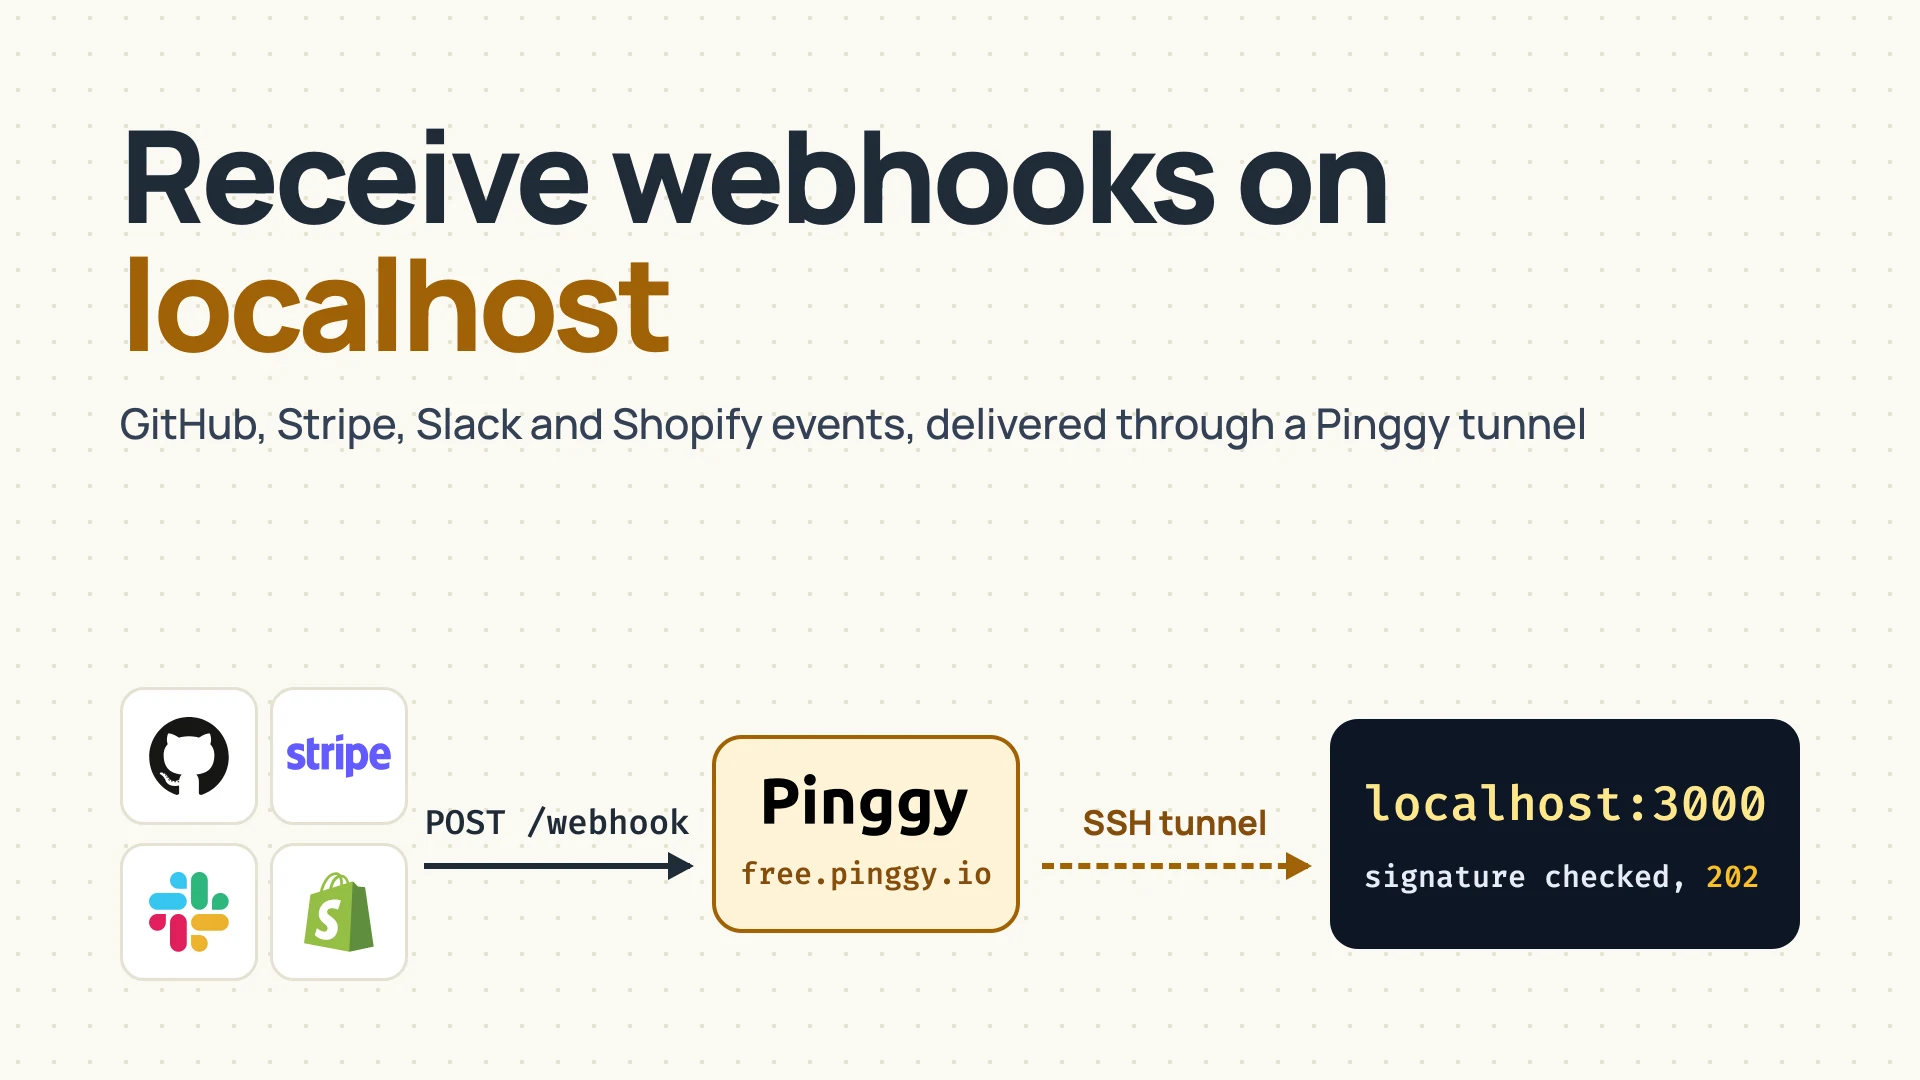
A lot of services now tell your app about events by calling it instead of waiting to be asked. A payment clears, someone opens a pull request, an order ships, and the provider sends an HTTP POST to a URL you registered with it.
That URL has to be public, and while you’re building the handler it runs on localhost:3000 behind a home router or an office NAT, where GitHub and Stripe can’t reach it. The fix has two halves: give the local port a public HTTPS address for as long as you’re testing, and make sure the handler only trusts requests that really came from the provider.
This guide follows one example the whole way: a GitHub repository webhook delivered to an Express handler on port 3000 through a Pinggy tunnel. Stripe, Slack and Shopify follow the same steps; only the signature details change. The handler and its tests were run on Node.js 25.5 with Express 5.3.0 in October 2026.
Summary
- One command gives localhost a public URL.
ssh -p 443 -R0:localhost:3000 free.pinggy.ioprints an HTTPS address that forwards to port 3000. Free tunnels last 60 minutes and get a new random URL each time; a Pro token keeps one subdomain. - Verify the signature on the raw bytes. GitHub signs the exact request body with HMAC-SHA256 and sends it in
X-Hub-Signature-256. Read the body withexpress.raw(), neverexpress.json(), and compare withcrypto.timingSafeEqual. - Reply fast and expect repeats. GitHub waits 10 seconds and never retries on its own, Shopify waits five seconds and retries 8 times over 4 hours. Return a 2XX first, queue the work, and skip delivery IDs you’ve already handled.
- Replay instead of re-triggering. Pinggy’s Web Debugger (
-L4300:localhost:4300, thenhttp://localhost:4300) shows every delivery and can resend it as-is or with edited headers. - Skip the tunnel when the provider ships a CLI.
stripe listenandgh webhook forwarddeliver events to localhost without a public URL.
How a webhook reaches localhost:3000
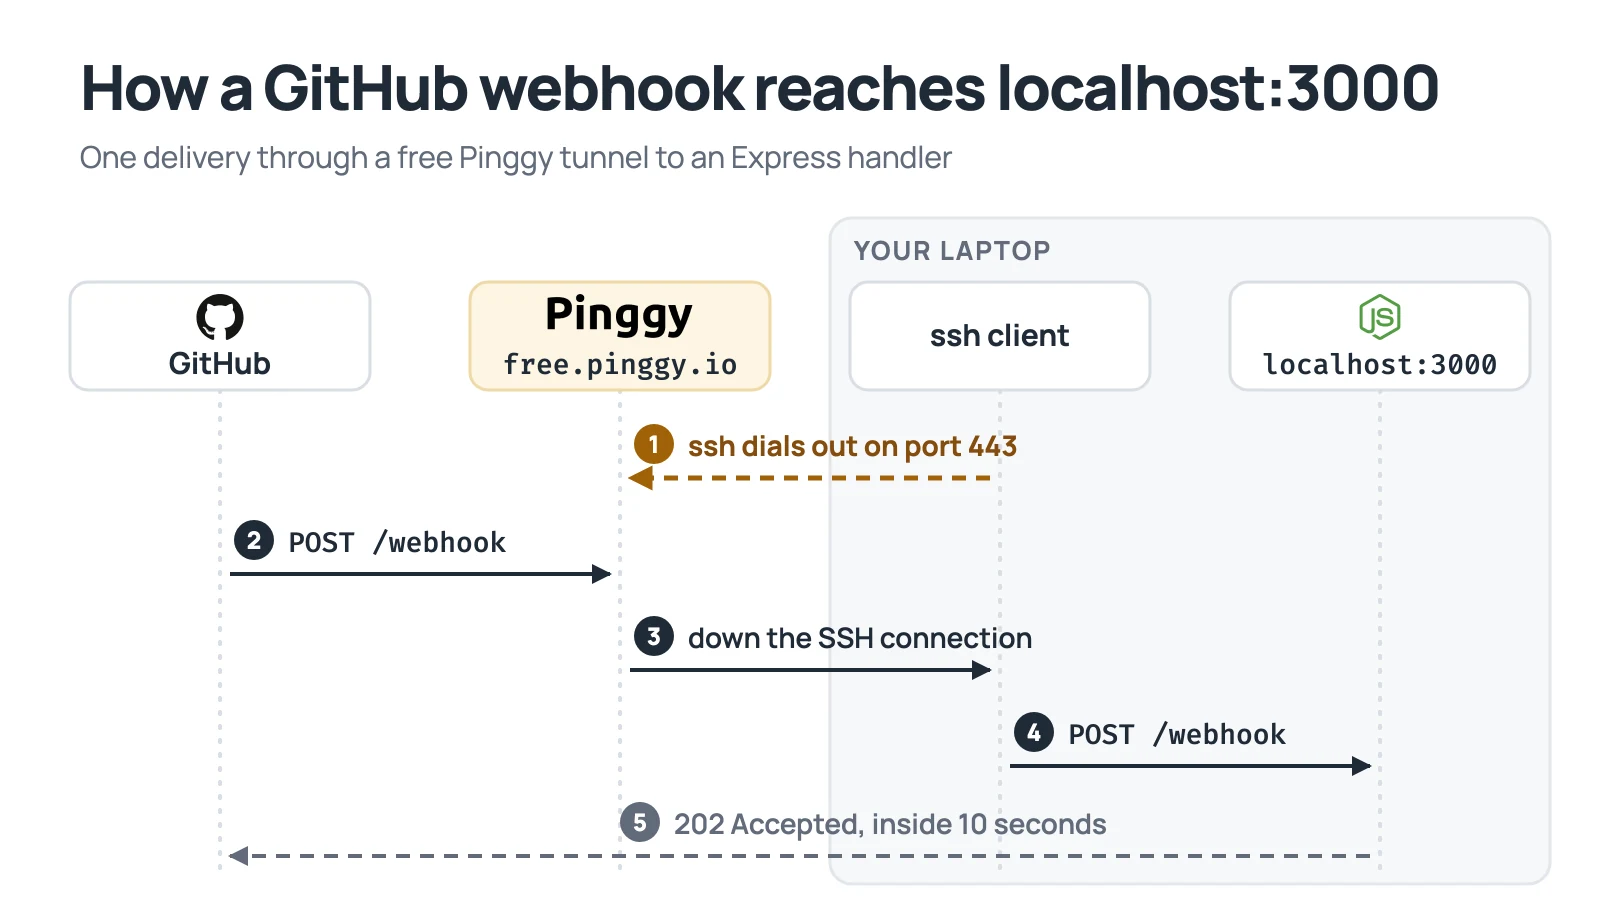
Nothing on your router changes. Your laptop makes the first connection, outward: ssh dials Pinggy on port 443 and asks it to forward a public URL back down that connection. When GitHub POSTs to the URL, the request goes GitHub -> Pinggy -> the SSH connection your laptop opened -> localhost:3000, and your handler’s response travels back the same way. Because the laptop starts the connection, it also works behind CGNAT, where forwarding a port on your own router doesn’t help because the router has no public IP.
Free URLs do show a one-time screening page, but only to browsers. Webhook senders, curl and HTTP client libraries go straight through to your handler.
Step 1: Write a handler that checks the signature
GitHub computes an HMAC-SHA256 of the request body using a secret you choose, and sends the hex digest as X-Hub-Signature-256: sha256=.... Your handler recomputes it and compares. Set up a folder and generate a secret:
mkdir webhook-demo && cd webhook-demo
npm init -y && npm install express
openssl rand -hex 32   # keep this; GitHub needs the same value
Save this as server.mjs:
import express from "express";
import crypto from "node:crypto";

const app = express();
const SECRET = process.env.GITHUB_WEBHOOK_SECRET;
const seen = new Set(); // in production: a unique index on the delivery ID

// express.raw() keeps the exact bytes GitHub signed. express.json() would not.
app.post("/webhook", express.raw({ type: "application/json" }), (req, res) => {
  if (!Buffer.isBuffer(req.body)) {
    return res.status(415).send("expected a raw application/json body");
  }

  const expected =
    "sha256=" + crypto.createHmac("sha256", SECRET).update(req.body).digest("hex");
  const received = req.get("X-Hub-Signature-256") ?? "";

  const a = Buffer.from(expected);
  const b = Buffer.from(received);
  if (a.length !== b.length || !crypto.timingSafeEqual(a, b)) {
    return res.status(401).send("bad signature");
  }

  // A redelivery keeps the same X-GitHub-Delivery ID, so skip repeats.
  const delivery = req.get("X-GitHub-Delivery");
  if (seen.has(delivery)) return res.sendStatus(200);
  seen.add(delivery);

  const event = req.get("X-GitHub-Event");
  const payload = JSON.parse(req.body.toString("utf8"));
  console.log(event, payload.action ?? "", delivery);

  // GitHub waits 10 seconds for a 2XX. Hand slow work to a queue.
  res.sendStatus(202);
});

app.listen(3000, () => console.log("Listening on http://localhost:3000"));
Start it with the secret in the environment. --watch restarts the server when you edit the file:
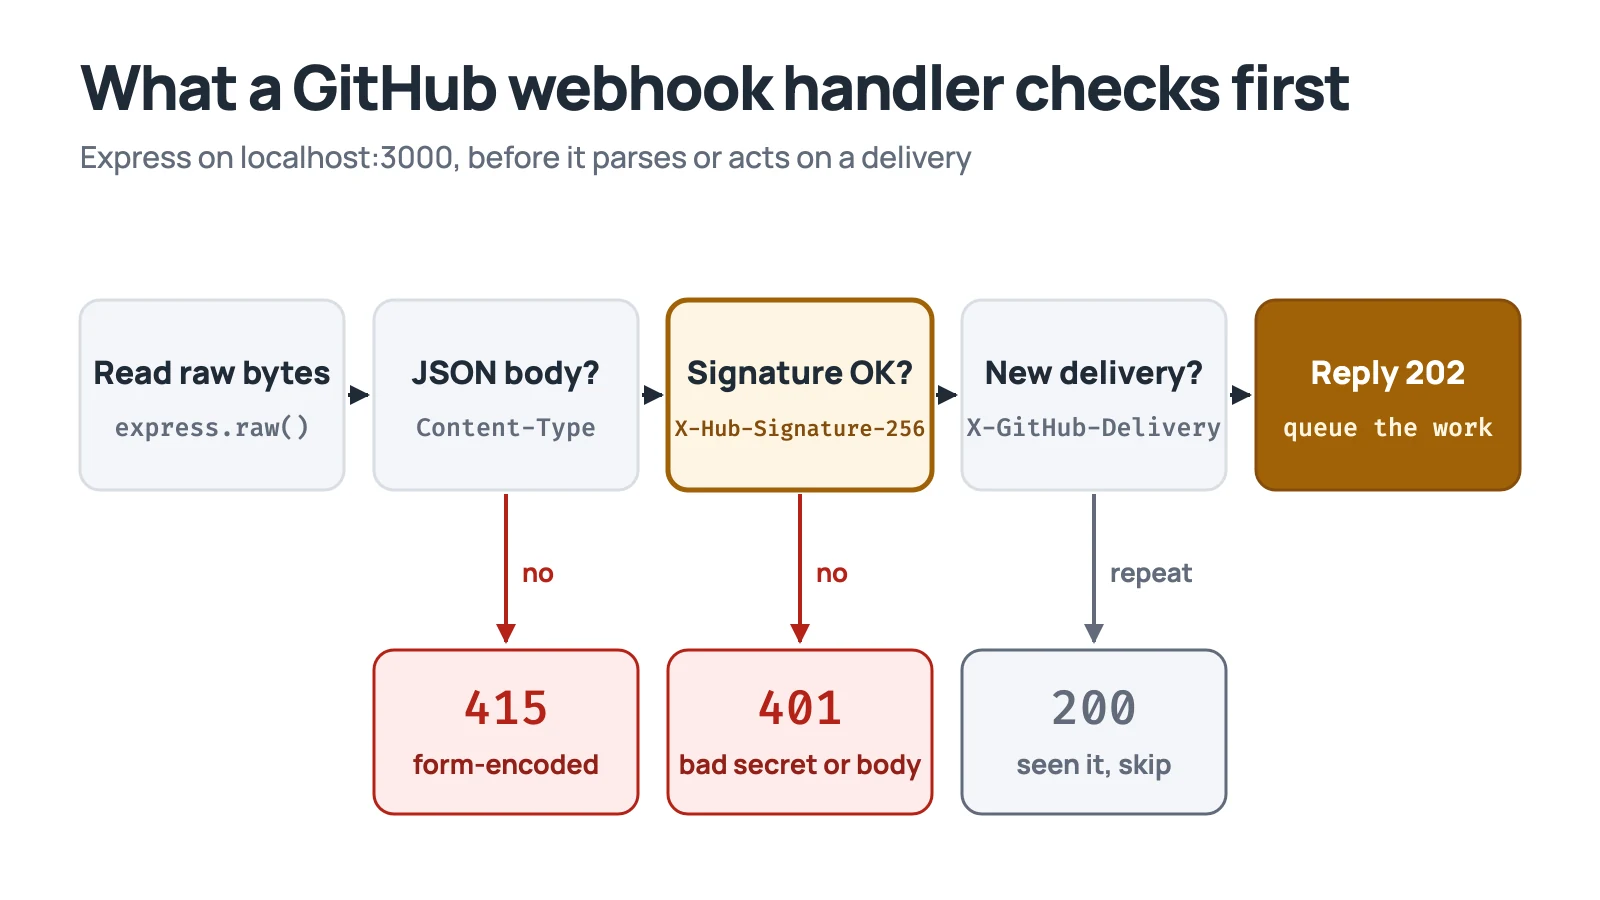
GITHUB_WEBHOOK_SECRET='paste-the-secret-here' node --watch server.mjsexpress.raw() matters most: the signature covers the exact bytes GitHub sent, and parsing JSON into an object and back can change whitespace or escaping, so the digest stops matching. The length check comes before crypto.timingSafeEqual because that function throws ERR_CRYPTO_TIMING_SAFE_EQUAL_LENGTH when the buffers differ in size, as they do when the header is missing. The X-GitHub-Delivery check works because, in GitHub’s words, “If you request a redelivery, the X-GitHub-Delivery header will be the same as in the original delivery.” And the early 202 matters because GitHub cuts the connection after 10 seconds and records the delivery as failed.
The in-memory Set is fine for a demo and wrong for anything real, since it forgets everything on restart. In production, insert the delivery ID into a table with a unique index inside the same transaction as the work, and treat a unique-violation as “already done”.
Before involving GitHub at all, you can test the handler locally with a request you sign yourself. This is the same check the handler does, done by openssl:
BODY='{"zen":"Design for failure.","hook_id":123}'
SIG="sha256=$(printf '%s' "$BODY" | openssl dgst -sha256 -hmac "$GITHUB_WEBHOOK_SECRET" | awk '{print $NF}')"

curl -i http://localhost:3000/webhook \
  -H "Content-Type: application/json" \
  -H "X-GitHub-Event: ping" \
  -H "X-GitHub-Delivery: test-1" \
  -H "X-Hub-Signature-256: $SIG" \
  --data "$BODY"
Run it in a terminal where GITHUB_WEBHOOK_SECRET is set to the same value. The first call returns 202 Accepted, the same call again returns 200 OK because the delivery ID repeats, and changing one character of BODY after computing SIG returns 401 Unauthorized.
Step 2: Open the tunnel
In a second terminal, point a tunnel at port 3000:
ssh -p 443 -R0:localhost:3000 free.pinggy.ioIf SSH asks for a password, press Enter. Pinggy prints the tunnel’s public URLs, including an HTTPS one shaped like https://uljtt-30-47-152-61.run.pinggy-free.link. Copy that one. You can also build the command here:
Try it yourself now
Free tunnels last 60 minutes and get a new random subdomain every time they start, so after a restart you have to paste the new URL into GitHub again. With a Pinggy Pro token ($3 a month, or $2.50 a month billed yearly), tunnels have no 60-minute limit and you can assign a persistent subdomain in the dashboard, so the webhook URL never changes.
The URL is public while the tunnel is up, so the signature check is what keeps out requests GitHub didn’t sign. Pinggy can also limit a tunnel to listed source IPs with its `w:` option, but GitHub advises against allowing its webhooks by IP address, because it changes those ranges from time to time. Rely on the signature.
Step 3: Point the GitHub webhook at the tunnel
In the repository, open Settings -> Webhooks -> Add webhook and fill in:
- Payload URL: the HTTPS tunnel URL plus the route, for example
https://uljtt-30-47-152-61.run.pinggy-free.link/webhook. - Content type:
application/json. - Secret: the same value you put in
GITHUB_WEBHOOK_SECRET. - Events: choose Let me select individual events and tick the ones your code handles.
Save it, and GitHub sends a ping event right away. Your terminal prints ping followed by the delivery ID, and the webhook’s Recent deliveries tab shows the full request, the response (202), and a Redeliver button. Trigger one of the events you ticked, such as pushing a commit if you chose push, and you’ll recieve the real event the same way.
Step 4: Inspect and replay deliveries with the Web Debugger
GitHub’s delivery log only covers GitHub. Pinggy’s Web Debugger shows every request that hits the tunnel, from any sender. It needs one extra flag on the tunnel command. A restarted free tunnel gets a new URL, so update the payload URL in GitHub afterwards:
ssh -p 443 -R0:localhost:3000 -L4300:localhost:4300 free.pinggy.ioOpen http://localhost:4300 and every request appears live with its headers, body and your handler’s response.

The two buttons above the request are what make this useful for webhooks. Replay resends a captured delivery as-is, which is the quickest way to prove your duplicate handling: a replayed GitHub delivery should get 200, not a second 202, as long as the server hasn’t restarted since the Set lives in memory. Modify and Replay lets you change the method, path, HTTP version or any header before resending, so you can break X-Hub-Signature-256 and confirm the handler answers 401. You test both failure paths without waiting for GitHub to send anything new.
Other providers: same handler, different header
The handler’s structure stays the same across providers. The header, the signed string and the reply window change.
| Provider | Signature header | What gets signed | Reply within | Retries |
|---|---|---|---|---|
| GitHub | X-Hub-Signature-256, sha256= + hex | Raw body | 10 seconds | None automatic; redeliver from the UI or API within 3 days |
| Stripe | Stripe-Signature, t=...,v1=... | timestamp.body | No number documented, “quickly” | Up to 3 days in live mode, 3 times over a few hours in a sandbox |
| Slack (Events API) | X-Slack-Signature, v0= + hex | v0:timestamp:body | 3 seconds | 3 retries, numbered in X-Slack-Retry-Num |
| Shopify | X-Shopify-Hmac-SHA256, base64 | Raw body | 5 seconds | 8 times over 4 hours |
Sources: GitHub, Stripe, Slack and Shopify webhook docs, checked October 2026.
Stripe and Slack mix a timestamp into the signed string, so a handler that checks it can reject a captured request replayed later. Stripe’s official libraries allow 5 minutes by default, and Slack’s docs say to ignore any request more than five minutes off your local time. Where a provider has an official SDK, use its verify function rather than your own HMAC code. Stripe’s Node.js constructEvent, for example, parses the header, checks the timestamp and compares signatures in constant time.
The raw-body rule applies in every framework, it just looks different. In Fastify, register a JSON content-type parser with { parseAs: "buffer" } so the route gets a Buffer. In a Next.js App Router route handler, await request.text() returns the unparsed body, which is what Next’s own webhook example uses. In Hono, await c.req.text() gives you the body string before any JSON parsing. Whichever you use, verify first and call JSON.parse after.
When you don’t need a tunnel
Some providers ship a CLI that pushes events straight into localhost over an outbound connection, with no public URL. Stripe’s works like this. Install it with npm i -g @stripe/cli@latest, brew install stripe or Stripe’s install script, run stripe login, then:
stripe listen --forward-to localhost:3000/webhookIt prints a whsec_ signing secret that stays the same between restarts, and stripe trigger checkout.session.completed fires a test event whenever you want one. GitHub has gh webhook forward (install it with gh extension install cli/gh-webhook), which forwards a repository’s or organization’s events to a local URL; only one person can forward a given repository at a time. GitHub’s own docs also still use smee.io, a relay that streams payloads to smee-client over Server-Sent Events. Its README warns that channels are not authenticated, so anyone with the channel URL can read the payloads. Slack apps can use Socket Mode, which receives events over a WebSocket instead of a public Request URL, though Socket Mode apps aren’t allowed in the public Slack Marketplace. We compare the Stripe, GitHub and Shopify CLIs, plus relay services like Hookdeck and Svix, in provider CLIs vs tunnels for webhook testing. A tunnel stays the fallback for the long tail of providers with no CLI.
If you only want to see what a provider sends before writing any code, a hosted inspector is quicker than either. Webhook.site gives you a URL instantly; free URLs accept up to 100 requests, expire after 7 days, and anyone who knows the URL’s ID can read what was sent. Hookdeck Inspect needs no account and keeps captured requests for 3 days. RequestBin, still named in older guides, now redirects to Pipedream’s homepage. For production, where a missed event costs money, a receiving gateway such as Svix Ingest, Hookdeck, or the self-hostable Convoy (Elastic License 2.0, so source-available rather than open source) sits in front of your app to buffer, retry and replay. Our roundup of webhook testing tools compares these in more detail.
Troubleshooting
Every delivery gets 415. The handler didn’t get raw JSON bytes. Either the GitHub webhook’s content type is set to application/x-www-form-urlencoded, or a global app.use(express.json()) runs before the webhook route and consumes the body first. Mount express.raw() on the webhook route only, as in the code above.
Every delivery gets 401. The secret in GitHub and the one in GITHUB_WEBHOOK_SECRET differ, for example by a trailing newline or a stray quote. Compare them, then use Redeliver.
GitHub reports a timeout or a failed delivery. Check whether the handler took longer than 10 seconds or the tunnel was down when GitHub sent it. GitHub doesn’t retry by itself, so fix the cause and click Redeliver in Recent deliveries. Deliveries from the past 3 days are listed there.
Deliveries stopped after an hour. The free tunnel hit its 60-minute limit. Restart it and update the payload URL, or use a Pro token with a persistent subdomain.
Nothing shows up at all. Check that the payload URL ends in /webhook and uses the HTTPS address. If the Web Debugger shows no request either, GitHub never reached the tunnel; if it does, the problem is on teh local side, in the route or the handler.
Conclusion
Receiving webhooks on localhost comes down to a public URL that forwards to your port and a handler that refuses anything it can’t verify. Get the loop working with GitHub’s ping, then turn the curl checks from Step 1 into tests: a correctly signed request gets 202, a repeat gets 200, and a wrong signature gets 401. Keep them in CI. A global JSON parser added months later turns every real delivery into a 415, and the 202 test catches it before production does.